Set Up a VLESS VPN Server Easily - Bypass Network Restrictions
Our automated installer script gets you a fully configured XRAY Reality server on Ubuntu 24.04 LTS. No manual config editing required.
Why VLESS + Reality?
Traditional VPN protocols like OpenVPN and WireGuard are easily detected and blocked by some regional internet blocks through deep packet inspection (DPI). VLESS with XTLS-Reality takes a fundamentally different approach. Instead of trying to hide your VPN traffic, it makes it look identical to a normal HTTPS connection to a major website like Microsoft or Apple.
The result? Your traffic becomes virtually indistinguishable from the billions of legitimate HTTPS requests flowing across the internet every day.
Reality also has a key advantage over older TLS-based setups: you don't need your own domain name or SSL certificate. The server impersonates a real website's TLS fingerprint using an X25519 key exchange, which makes the setup simpler and even more resistant to detection.
What You'll Need
Before you start, make sure you have:
- A VPS running Ubuntu 24.04 LTS. Popular locations to bypass regional blocks include the US, Japan, Singapore, and Hong Kong. If you need one, our VPS plans at ExtraVM come with clean IPs and global availability.
- Root access to the server (either log in as root or have sudo privileges).
- An SSH client to connect to your server. Terminal on macOS/Linux, or PuTTY / Windows Terminal on Windows. We use and suggest Termius.
Step 1: Connect to Your Server
Open your terminal (or use your own SSH client) and SSH into your VPS:
ssh root@YOUR_SERVER_IPReplace YOUR_SERVER_IP with your actual server IP address. If you're using a non-root user with sudo access, log in with that user instead, the script will check for root privileges when it runs.
Step 2: Download the Installer Script
Download the installer directly to your server:
curl -O https://extravm.com/blog/uploads/xray-vless-installer.shStep 3: Run the Installer
Make the script executable and run it:
chmod +x xray-vless-installer.sh
bash xray-vless-installer.sh
The script will walk you through the entire process. Here's what to expect at each stage.
3a. Pre-Flight Checks
The installer starts by verifying your environment:
[INFO] Detecting server IP address...
[  OK] Server IP: 123.45.67.89
It automatically detects your public IP, checks that you're running as root, confirms you're on Ubuntu, and verifies that port 443 is available. If another service like Nginx or Apache is occupying port 443, it will offer to stop it for you.
3b. Choose Your SNI Domain
Next, you'll see an interactive menu to pick a destination domain:
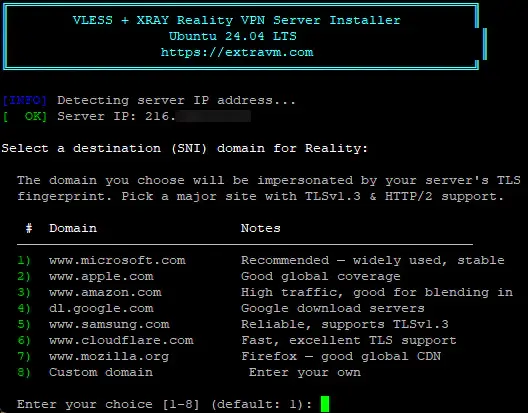
Which one should you pick? For most users, option 1 (www.microsoft.com) is the safest bet. It's a high-traffic site with servers worldwide and strong TLS 1.3 support. If your VPS is in Asia, options like www.samsung.com or www.apple.com can also work well due to their regional CDN presence.
After you make your selection, the script validates that the domain supports TLSv1.3 before continuing.
3c. Confirm and Install
You'll see a summary of your settings and a final confirmation:
  Ready to install with the following settings:
    Server IP:   123.45.67.89
    SNI Domain:  www.microsoft.com

  Proceed with installation? (Y/n):
Press Enter or type Y to start the installation. The script will then:
- Update system packages and install dependencies
- Download and install the latest XRAY-core
- Generate all security credentials (UUID, encryption keys, short ID)
- Enable Google's BBR congestion control for better speed
- Write and validate the XRAY configuration
- Open port 443 in your firewall
- Start the XRAY service and enable it on boot
The whole process takes about one to two minutes depending on your server's speed.
Step 4: Save Your Connection Details
Once the installation finishes, the script outputs everything you need to connect:
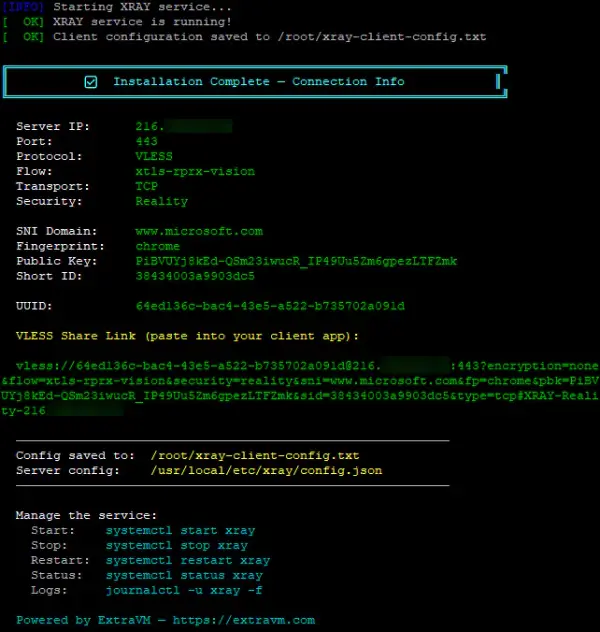
Everything is also saved to a file at /root/xray-client-config.txt on your server. You can view it any time by running:
cat /root/xray-client-config.txtImportant: Treat your UUID and keys like passwords. Anyone with these values can use your VPN server. The config file is set to root-only permissions (600) for security.
Step 5: Set Up Your Client Device
Now you need to configure a client app on the device you'll be using. Here are the best apps for each platform:
- Windows | v2rayN | GitHub |
- macOS | V2BOX | App Store |
- macOS | FoXray | App Store |
- iOS | V2BOX | App Store |
- iOS | Streisand | App Store |
- Android | v2rayNG | GitHub |
- Linux | Nekoray | GitHub |
Option A: Use the Share Link (Easiest)
The fastest way to configure your client is to copy the VLESS share link from the installer output. It starts with vless:// and contains all settings encoded in a single string.
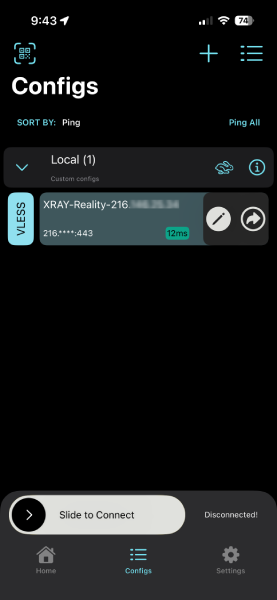
On mobile (iOS/Android):
- Copy the share link to your clipboard (or send it to yourself via AirDrop, email, etc.)
- Open your VPN client app (V2BOX, v2rayNG, etc.)
- Look for an Import or + button
- Select "Import from clipboard" or "Paste from clipboard"
- The server will appear in your server list - tap it to connect
On desktop (Windows/macOS/Linux):
- Copy the share link
- Open your client app (v2rayN, Nekoray, etc.)
- Go to "Add server" → "Import from clipboard"
- The server will be automatically configured
Option B: Manual Configuration
If the share link doesn't work with your client, or if you prefer to set things up manually, enter these settings when adding a new server:
| Setting | Value |
|---|---|
| Protocol | VLESS |
| Address | Your server IP from the output |
| Port | 443 |
| UUID | Your UUID from the output |
| Flow | xtls-rprx-vision |
| Encryption | none |
| Transport | TCP |
| Security | Reality |
| SNI | The domain you selected (e.g. www.microsoft.com) |
| Fingerprint | chrome |
| Public Key | Your public key from the output |
| Short ID | Your short ID from the output |
Make sure every field matches exactly, especially the public key and short ID, as even a single wrong character will prevent connection.
Step 6: Verify the Connection
After connecting through your client app, run through these quick checks to make sure everything is working:
- Check your IP address. Visit ipinfo.io in your browser. The IP shown should be your VPS IP, not your local IP.
- Test blocked sites. Try loading Google, YouTube, Twitter/X, or any other site normally blocked by your internet provider.
- Run a DNS leak test. Go to dnsleaktest.com and run the extended test. Your DNS queries should be resolving through your VPS, not your local ISP.
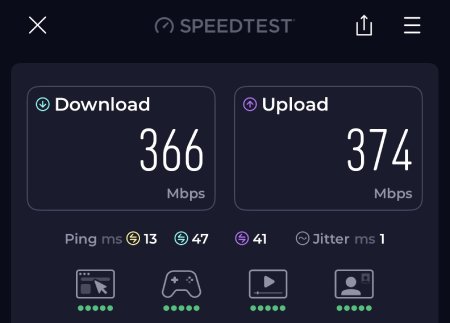
If all three checks pass, your VPN is working correctly.
The XRAY VLESS VPN is efficient, working with fast internet connections if the routing permits.
Last updated: February 2026